Showing posts with label Eating Real Foods. Show all posts

2.17.2011

One Way To Take Tea


This is how I've been enjoying my tea ~

One cup of steaming hot water, with one peach tea bag, steeped for about five minutes, then drizzled with honey and cooled slightly with half and half.

So good.

What have you been enjoying in these cooler months?

           Warmly,
post signature
P.S.  Did you enter our giveaway for the Jesus Storybook Bible Deluxe Edition yet?  It ends Friday night!

[also shared at Nourishing Gourmet and Simple Lives Thursday]


 If you enjoyed this post, subscribe to Like a Bubbling Brook - it's free! Follow along on Facebook.


2.09.2011

Guest Post: 5 Ways to Begin a More Self-Sufficient Lifestyle, Part One

[photo: Kendra's pear preserves...yum!]

~ Precious mamas, my family is off on an adventure this week, and the very talented Kendra from New Life On a Homestead has graciously agreed to share her thoughts with you here today.  This is Part One of "5 Ways to Begin a More Self-Sufficient Lifestyle."  Be sure to check back on Friday for Part Two.  I'll return next week and will share some exciting news! ~


The idea of learning to do more for your family and depend less on others to survive can seem like a daunting task. Where do you begin? Some people imagine the self-sufficient life to mean hauling water from a nearby creek in a bucket and using the bathroom outdoors. Doing more on your own doesn’t have to begin so dramatically (although, I think being prepared for off-grid living is a worthy goal!). Starting slowly is the best way to prevent yourself from being overwhelmed and burning out quickly.

Here are five easy ways anyone can begin living a more self-sufficient lifestyle, and learn to survive without having to depend on others for the most basic necessities:

1.  FOOD

The most important thing you can ever learn is to do is to grow your own food. You don’t have to have a huge yard to have a garden, either. Container gardening can be just as productive, and even more productive, than a traditional garden plot in the yard.

If you are new to gardening, and a little intimidated by the idea, start off by purchasing a few of your favorite vegetable plants from a local nursery. Don’t go crazy and buy a bunch of stuff though; you don’t want to overwhelm yourself! Ask the nursery worker for advice on planting your seedlings at home, borrow a few gardening books from your library or look up info online, and get those beautiful veggies in some soil!

2.  WATER

Another most basic necessity you’ll need to learn is how to harvest water. Even if you are on city water and don’t think you’ll ever need to worry about finding it for yourself, it’s an extremely important skill to have under your belt. You don’t have to use it every day, but knowing that if you had to, you could provide clean water for your family, will definitely be a comfort to you and your loved ones.

If you are on a private well, consider installing a hand pump on it, if you can afford to do so. Or, you can learn to make a small emergency well bucket, like this one, to have on hand, so that you can access your well water when power isn’t available.

Installing rain barrels is another important step toward self-sufficient living. Not only can you water your plants and animals with this precious resource, you could also wash your clothing, dishes, and filter it for drinking water, if you had to. If you’re planning on collecting water from either the rain or from a stream, you’ll need to filter it before it’s safe to drink. You can make a homemade Berkey style water filter for a fraction of the price of the real thing.

3.  CLOTHING

Learning to sew your own clothing is a huge step toward becoming more self-sufficient. Think of all of the money our culture spends on fashion! If you could learn to make simple clothing items for you and your children, what a blessing that knowledge would be to have. If you are new to sewing, start off small by learning to hem, mend, and attach buttons.


...to be continued in Part Two this Friday!  Be sure to subscribe for free email updates of new posts so you don't miss it!


Kendra is a full time, homeschooling stay-at-home mom to three little ones, with a fourth on the way! Her and her husband moved to the country two years ago and have been working hard at learning how to live a more self-sufficient lifestyle.

You can follow the ups and downs of their journey at New Life On A Homestead.


 {also shared at Simple Lives ThursdayRaising Homemakers and WFMW}
 
 
If you enjoyed this post, subscribe to Like a Bubbling Brook - it's free!
You can also easily follow along on Facebook.

~ Have you entered our 1st birthday giveaway yet? ~


1.11.2011

Southwestern Black Bean Tacos: Easy, Frugal, Healthy, and Yummy


We've made different variations of these "tacos" for years.  For awhile, I served this just as a bean salad, chilled.  Then I made it without a couple of the ingredients and served them in whole wheat tortillas.  Now, I've tweaked them a bit more, and think they taste best served on some Ezekiel sprouted grain tortillas, lightly toasted in an oiled cast iron skillet.  Mmmm!  Lots of flavor!

For the family members that prefer meat, it also works well with a bit of shredded chicken thrown in.  


Here's what you'll need:

1/3 cup of lime juice
salt and pepper
2 tbsp olive oil

2 cups of frozen corn kernels
2 cans (or about 3 1/2 cups) of black beans
1 ripe avocado, chopped
1/4 green bell pepper, chopped
1/4 red bell pepper, chopped
1 small onion, chopped fine
1/4 cup finely chopped cilantro

Here's what to do:

Whisk the first three ingredients (for the dressing) in a small bowl; set aside.

Heat a lightly oiled frying pan over medium high.  Lightly toast corn until spotty brown but not charred, about five minutes.  Remove from heat.

In a large bowl, add the remaining ingredients and the toasted corn.  Drizzle with the dressing and mix well.  Season with additional salt and pepper if desired.

In the same skillet that you used to toast the corn, heat about three tablespoons of oil and lightly toast the Ezekiel sprouted grain tortillas, one at a time.  You may need to add more oil to the skillet as you go.

Spoon the bean mixture over the tortillas and serve.


Enjoy!


            Warmly,

post signature


If you enjoyed this post, subscribe to Like a Bubbling Brook - it's free!
You can also easily follow along on Facebook.

 
*Shared at Nourishing Gourmet, Ultimate Recipe SwapWomen Living Well WednesdayDomestically Divine, 5 Dollar Dinners, Tasty Tuesday, {Titus2}sdays, Slightly Indulgent Tuesday, Real Food Wednesday, Raising Homemakers, and WFMW

1.05.2011

Portuguese Bean Soup


One of our Daniel Fast meals this week was this bean soup; it's a regular around here when we are cleansing, and it fits the requirements for the Daniel Fast as well.

Normally, I would only use white beans such as cannellini or great northern, but I was low on white beans so I added in some red kidney beans to make up the difference.

Here's what you'll need:

2 tbsp olive oil
1 coarsely chopped sweet onion
2 cloves garlic
6 cups vegetable broth
2 cups water
1 sweet potato, peeled and diced in 1/2 inch pieces
1 can diced tomatoes
4 cups white beans (I like cannellini beans best)
1 cup frozen chopped collard greens
dash of chili powder
2 tbsp red wine vinegar (more or less, to taste)

Heat oil in a stock pot or dutch over over medium high heat.  Add onion and garlic, and saute for about three minutes.  Add remaining ingredients and bring to a simmer.  Reduce heat, cover, and simmer gently until sweet potatoes are tender.  Ladle into bowls.

If you read the labels for boxed crackers at your supermarket or health food store, you should be able to find some that are made only of whole wheat, oil, and salt.  They are yummy crumbled on top and add a nice texture to the soup.


Blessings to you as you seek His face today ~

           Warmly,
post signature

Shared at Nourishing Gourmet, Ultimate Recipe Swap, and Prairie Story Recipe Swap

 
If you enjoyed this post, subscribe to Like a Bubbling Brook - it's free!
Follow along on Facebook.

Try Crown Financial Ministries' online envelope budgeting program, Mvelopes, FREE for two weeks by using this link. Cancel anytime! [ad]


1.02.2011

Daniel Fast Meal Plan and Recipes, Week of 1/3/11


Monday marks the beginning of this year's Daniel Fast at our church.  Are you familiar with it?  It's intended to simulate a fast that Daniel did, as mentioned in Daniel 10:2-3 ~

In those days I, Daniel, was mourning three full weeks.  I ate no pleasant food, no meat or wine came into my mouth, nor did I anoint myself at all, till three whole weeks were fulfilled.
We will be abstaining from all meats and animal products, as well as from sweeteners, baked goods, and leavened breads.  Last year, my husband and I personally permitted a nominal amount of honey and pure maple syrup in our fast, but this year we will completely go without.  There will be no artificial preservatives, processed foods, deep fried foods, etc.  Our diet will consist mostly of fruits, vegetables, beans, grains, and nuts.  Our only beverage will be water.

Here's our meal plan for this week:

Breakfasts ~
Fresh fruits, natural peanut butter
Creamy toasted rice porridge with coconut oil, raisins, and almonds

Oats groats with raisins, nuts, and almond paste

Lunches ~
Leftovers, salad

Dinners ~

Veggie chili
Southwestern black bean tacos on toasted Ezekiel wraps
Lentil soup (without the turkey bacon or wine), whole wheat chapatis
Roasted vegetables over short grain brown rice
White bean soup with greens, whole wheat chapatis
Curried winter vegetables over long grain brown rice

Snacks ~
Fresh fruits
Veggies and my
easy garlic hummus
Nuts
Raisins
Roasted sweet potato "fries"
Popcorn


***I plan to be sharing a few more of these recipes this week and next as we go along, so please subscribe for email updates if you haven't already... that way you won't miss a post!***

The Daniel Fast closely resembles a whole foods cellular cleanse we do each year for health purposes, and we've really needed to cleanse after all the holiday treats we've enjoyed the last six weeks or so. As difficult as it is, I'm looking forward to this fast! We need it, both physically and spiritually!

It's a big year, there's much to do, and grand plans are ahead of us. Through it all, I'll be praying for you. Some of you really struggled through 2010, and I'm believing 2011 will be a year of breakthroughs in your homes, marriages, and families. I want this site to be an oasis of hope, healing, and truth for you, a place where you can find inspiration and encouragement and feel Him stir your soul and tug at your heart.

My heart's desire is to be in tune and connected with Him throughout this year and every year He graciously gives to me.  

I'm so glad you join me here, and desire to be connected with Him, too.

           Warmly,

post signature

Linked with Menu Plan Monday


If you enjoyed this post, subscribe to Like a Bubbling Brook - it's free! You may also easily follow along on Facebook.

Try Crown Financial Ministries' online envelope budgeting program, Mvelopes, FREE for two weeks by using this link. Cancel anytime! [ad]


12.14.2010

Fluffy Oat Pancakes... Mmmm!


These oat pancakes are always Gentry's first choice for breakfast.  In the evenings, during his bedtime prayers, I can often hear him begin with, "Dear God, please let mommy make pancakes for breakfast in the morning..."  So sweet!  How could I not indulge the child?

They are especially yummy topped with sliced bananas and real maple syrup.

Here's what you'll need:

1 1/2 cups of oat flour
1/2 cup of rolled oats
1/2 cup of all-purpose flour
3 1/2 teaspoons baking powder
1 teaspoon salt
1 1/2 cups milk
2 eggs
3 tablespoons butter, melted and cooled slightly

In a large bowl, combine flours, oats, baking powder, and salt.  Pour in the milk, eggs, and melted butter.  Mix until smooth.

Using a lightly oiled griddle or frying pan (warmed over medium high heat), cook the pancakes.  Use 1/4 cup of batter for each pancake.  Brown on both sides and serve while warm. 

If you have a couple of extra pancakes, they keep well in the freezer.

Enjoy!  And, if you have the time, take a peek at my simple Christmas decor ideas and join me for a Parade of Christmas.

           Warmly,
post signature
 
Also shared at Nourishing GourmetRaising HomemakersReal Food WednesdayTasty Tuesday, Tuesdays at the Table, Slightly Indulgent Tuesday, and Domestically Divine.


~~~~~~~~~~~~~~~
If you enjoyed this post, subscribe to Like a Bubbling Brook - it's free! Follow along on Facebook.

Try Crown Financial Ministries' online envelope budgeting program, Mvelopes, FREE for two weeks by using this link. Cancel anytime! [ad]


12.07.2010

Easy Garlic Hummus Dip


Looking for a flavorful, easy dish to take to a holiday gathering?  This garlic hummus is addictive!  You can use it as a dip or a spread, and serve it alongside veggies, pita bread, or pita chips.

Here's what you need:

1 16 oz can garbanzo beans, drained (reserve 4-5 tablespoons of the liquid)
2 tablespoons tahini
1/8 cup + 1 tablespoon lemon juice
1 teaspoon salt
2 cloves of garlic
1 tablespoon olive oil
pinch or two of ground red pepper
pinch of dried parsley

What to do:

Place everything except for the parsley in a food processor.  Blend until smooth.

Transfer mixture to a serving bowl and sprinkle with an additional pinch of red pepper and a pinch of parsley.

Serve with veggies, pita bread, pita chips, small toasted bread pieces, or crackers.  Yum!

Join me for hors d'eouvres, anyone?  Oh, I wish you would!

            Warmly,
post signature


~~~~~~~~~~~~~~~
***If you enjoyed this post, subscribe to Like a Bubbling Brook via email updates - it's free!
You can also easily follow along on Facebook.


12.01.2010

Do-It-Yourself Gift Idea: An Elegant Chai Tea Kit

Wouldn't a homemade chai tea kit make a warm, cozy Christmas gift?

I'm envisioning a kit that is elegant, but useful, much like the one here:

[photo credit]
 It would be easy to do, and should cost you less than $5 each if you plan to make four kits and purchase some of your spices and containers in bulk.  For great containers (glass, plastic, or tin) you can shop around your local craft store, or order them very inexpensively from American Science & Surplus.  They have pretty little glass bottles, some in a 20 packs for only $2 or $3, and corks as well.  One 20 pack should make four gifts if you use five bottles or vials per gift.

Fill your little containers with:

Cinnamon sticks
Ground or dried ginger
Whole cloves
Ground or whole cardamom pods
Ground or whole nutmeg
Black tea or tea bags

And include a card, perhaps printed in a calligraphy font, with these directions:
In a saucepan, bring two cups of water to a simmer. Add three black tea bags. Season with one cinnamon stick, four cloves, 1/4 teaspoon of cardamom, 1/4 teaspoon of ginger, and a pinch of nutmeg. Simmer for 5-10 minutes, slightly covered. Pour in two cups of milk, and return to a gentle simmer. Remove from heat, and strain through a fine sieve.  Add honey to sweeten if desired.
Arrange the items in a simple box or basket, and you have a beautiful, inexpensive gift!

I can often find the spices that are listed above near the international or Hispanic section of my supermarket.  They are sold in larger bags, and cost much less than the spices you may traditionally buy in the small containers.  For example, San Miguel Mexican Products sells 5" whole cinnamon sticks in an 8 oz bag for only $3 or so.  This would be enough to use in at least four kits.

I'll be sharing more inexpensive, do-it-yourself gift ideas in upcoming posts.  Now would be a good time to subscribe if you haven't already!

Do you have any favorite frugal gift ideas?  Share them in the comment section.  I'd love to hear about them!


            Warmly,
post signature


~~~~~~~~~~~~~~~
If you enjoyed this post, subscribe to Like a Bubbling Brook updates - it's free!
You may also follow along on Facebook.
Get great local deals up to 90% off at Groupon. {ad}

{Shared at Nourishing Gourmet}


11.16.2010

Maple Pecan Muffins


*This is a repost from the archives; I'm making these this morning and thought I'd share the recipe with my new readers.  Enjoy!

I thought I'd share a favorite recipe today; this one is for 100% Whole Wheat Maple Pecan Muffins.  Using freshly ground wheat makes them even yummier and better for you!  These are a very light muffins, not too sweet, with the perfect hint of maple.

Here's what you'll need:

1 1/2 cups whole wheat flour
1 1/2 tsp baking powder
1/2 tsp salt
1/2 c chopped pecans
1/3 c real maple syrup
2 tbsp softened butter
1 egg
2/3 c water
1 tsp vanilla

Preheat oven to 375F.  Oil a 12-cup muffin pan.

Mix flour, baking powder, and salt together.  Stir in pecans.

Beat syrup and butter, then add the egg.  Add water, vanilla, and the dry ingredients, stirring just enough to mix.

Spoon into muffin pan, and bake 12 to 15 minutes.

Enjoy!

Note:  I usually add a handful of chocolate chips to the muffins.  Just a variation! :o)


           Warmly,

post signature
{Linked with Raising HomemakersSlightly Indulgent TuesdayTasty TuesdayNourishing Gourmet, Food Renegade, and Real Food Wednesday.}


~~~~~~~~~~~~~~~
If you enjoyed this post, subscribe to Like a Bubbling Brook - it's free!
You may also want to follow along on Facebook.


11.14.2010

Menu Plan For The Week Of 11/14


An autumn weekend is the perfect time to bake my cinnamon raisin walnut bread
My sweet husband preached this morning, showed support at our church's charity brunch this afternoon, and then came home and finished putting up the last bit of fencing in our backyard.  He's worked hard today, and all the while I've been inside baking an apple dumpling cake, making fresh vegetable juice, entertaining the children, and getting some blogging done :)  It's been a productive day, and now my meal plan is complete for the week, too!

Breakfasts ~
Eggs with horseradish and dill
Toast with blueberry preserves
Maple pecan muffins
Oats with maple syrup, fruit, and almond paste
Cinnamon raisin walnut bread

Lunches ~
Leftovers or a quick sandwich

Dinners ~
Patio steaks with grilled potatoes and grilled carrots with honey-butter glaze
Potato soup with crumbled turkey bacon and crusty authentic pretzel bread
Cheesy chicken spaghetti (I think I may try a new bread recipe to go with this dish... if it's yummy, I'll share it with you all!  Stay tuned!)
Teriyaki stir fry with chicken and vegetables
Roasted chicken with roasted autumn vegetables over brown rice

What's for dinner at your house this week?  Any favorite recipes?

           Warmly,

post signature
{Linked with Orgjunkie's Menu Plan Monday}


~~~~~~~~~~~~~~~
If you enjoyed this post, subscribe to Like a Bubbling Brook - it's free! You may also follow along on Facebook.


10.12.2010

My Latest Kitchen Secret, In More Detail


A week or two ago I posted one of my kitchen secrets; did you get a chance to try it?  Since then I've had several emails asking for more details about how I prepare my chicken, and one email in particular was from a sweet friend.  She said:

I LOVED the idea about grilling chicken and storing it in freezer bags. What a great time saver! Whenever you have a minute, I was hoping you could share with me how you prepare your chicken. Usually when we grill chicken, it is BBQ chicken legs, so I was looking for an idea on prepping the breasts.

It never occurred to me to share more details about my "fill the grill" secret. These reader questions are certainly worthy of a follow-up post!

It all began three or four months ago, when our local supermarket ran a major loss leader sale on bags of Perdue frozen boneless skinless breasts.  I don't usually buy these, but at just a little over $3 a bag (and each bag is about three pounds) I could not resist!  This was a great price for boneless, skinless chicken where I live.  Needless to say, I bought probably fifteen bags total.  The store had a limit of 3 per visit, so I made many trips to the store that week :)

I began to wonder how to use up all that chicken economically, and that's when my "fill the grill" experiment began. 

Here's my process:

The night before you plan to grill, take one or two bags of chicken out of the freezer and place them in the fridge to thaw.  I know, I know..... you can throw them onto the grill frozen, but I don't think it tastes as good when it's cooked that way.

The next day, about an hour or two before you begin grilling, set the bags of chicken out on the counter to get the chill off, then trim the chicken and fire up the grill.  I usually start mine on high.

Place the trimmed chicken in a large bowl and drizzle with olive oil, turning to coat.  Season liberally with salt and pepper.  Sometimes I also add a bit of garlic powder.  Turn again, making sure chicken is evenly coated.

Grill the chicken, turning occasionally.  I keep the temperature at medium high for most of the grilling process, since we like our chicken with some char.

(If you will be sneaking a few of these breasts off the grill for dinner, brush on some bbq sauce the last minute or two that they're on the grill.) 


Remove the chicken and let cool on a cutting board, then chop into one inch pieces.  Fill sandwich bags about 2/3 full with the chicken, then add the filled sandwich bags into a larger freezer bag to store in the freezer.

When you know that you'll need a quick meal, pull a small bag of chicken out, and it thaws in just a couple hours.


Some ideas for the diced chicken:

Pitas (with a spoonful of plain yogurt, greek olives, tomatoes, etc)
Burritos (with cilantro, lime, rice, lettuce, etc)
Chicken salad sandwiches
In a pasta dish
On top of a pizza
In a taco shell (with some veggies, cheese, and sour cream)

What are your ideas?  What would you thaw the diced chicken for?

post signature

{Linked with Ultimate Recipe SwapWFMW, and Raising Homemakers}


~~~~~~~~~~~~~~~
If you enjoyed this post, I hope you'll take a minute to subscribe to Like a Bubbling Brook - it's free!
You can also follow this blog on Facebook.
Get great local deals up to 90% off at Groupon.
Try Crown Financial Ministries' online envelope budgeting program, Mvelopes, FREE for two weeks by using this link. Cancel anytime!


9.27.2010

How to Make Whole Wheat Bagels from Scratch


Yummy, slightly chewy, especially wonderful when toasted ---- BAGELS!  Ooooh, don't you want to try these, too?  They're delicious!

Like many whole grain breads, the soaker and biga pre-doughs need to be prepared the night before.   Soaking the whole wheat flour overnight helps with digestibility and also makes the bagels taste better... if you've ever eaten a "grainy" tasting whole wheat bread, then you know what I mean.  Soaking the wheat overnight adds to the taste of the bagel, making it a bit smoother tasting. 

You'll like it, and it's not that hard, I promise!

I used freshly ground, organic hard white wheat for these bagels.  If you haven't already, you may want to read my post about why using freshly ground wheat is your best bet

This recipe is adapted from one of my favorite cookbooks, Peter Reinhart's Whole Grain Breads...  I can't recommend it enough!


100% Whole Wheat Bagels

Here's what you do:

Soaker (the night before):

1 3/4 cups whole wheat flour (we use freshly ground, but you don't have to)

1/2 tsp salt

1/2 c plus 2 tbsp water

2 tbsp honey

Combine all and mix until hydrated. That's all.  Cover loosely at leave out on the counter overnight.

Biga (the night before):

1 3/4 c whole wheat flour

1/4 tsp yeast

1/2 c plus 2 tbsp room temperature water

Mix together. Using wet hands, knead dough in a bowl for two minutes. Dough should still feel tacky. Let dough rest for about five minutes, then knead again with wet hands for one minute.

Transfer to a clean bowl. cover, and refrigerate overnight.

*In the morning, about two hours prior to mixing the final dough, set out the biga so that it can return to room temperature.

Final Dough (the day of baking):

All of soaker

All of biga

Approx 7 tbsp whole wheat flour

5/8 tsp salt

2 1/4 tsp yeast

2 tbsp water at room temperature

poppy seeds or sesame seeds for garnish, if you like

2 teaspoons baking soda

Chop or tear the soaker and biga into 12 smaller pieces, and dust with flour so that they don't stick back to each other.

Combine soaker and biga pieces in a bowl. Dissolve yeast in the two tbsp of water.  Add yeast mixture to soaker and biga in a large bowl, then add salt and knead with wet hands for about three minutes. The dough should be fairly firm and not sticky; use more flour or water for adjustments if necessary. Different flours absorb different amounts of moisture.

Knead for 3 more minutes. Form dough into a ball and let it rest for five minutes while you prepare a lightly oiled bowl.

Resume kneading the dough for one minute. Form the dough into a ball and place it into the prepared bowl. Cover loosely and let rise at room temperature for 60 minutes.

When the dough is ready, sprinkle a work area with flour and divide the dough into six balls.  Roll each piece into an 8-inch rope and shape it into a circle around your hand.  Seal each one well by squeezing it where the two ends overlap.  You should have about a two inch hole in the center of each bagel.

Place the bagels onto a baking sheet lined with parchment paper and misted with pan spray.  Cover loosely with a cloth towel.  Let rise for about twenty minutes or so while you continue on to the next steps.  This is what it will look like:


Preheat the oven to 500.

Bring four or five inches of water to boil in a wide pot.  When it comes to a boil, add the two teaspoons of baking soda... watch out, though, because it may bubble and fizz a bit.  Lower the heat just enough to maintain a steady simmer.

Using a large slotted spoon, or skimmer, carefully place one or two bagels into the water at a time.  They should float within 30 seconds.  After thirty seconds, gently turn them over and allow them to boil an additional 30 seconds.  They will be in the water for about one minute total each; repeat this for each of the bagels, returning them to the baking sheet when their minute is done.


Apply toppings, if using. 


Place the baking sheet on a middle shelf, and lower the temperature to 450. Bake for 15 minutes, then rotate the pan 180 degrees and bake another 10-15 minutes, until bagels are a rich brown.

Place bagels onto a cooling rack and let cool for about twenty minutes before serving.


Absolutely delicious!

           Warmly,
post signature


Thanks for taking the time to visit Like a Bubbling Brook.   If you're new here, you may wish to subscribe to receive free updates via email.   You can also see more of my healthy and yummy recipes by visiting my recipe index.


9.15.2010

Crusty Oat & Flax Bread


Be aware, there's quite a process involved in making this bread, but it's worth it, and it gets easier each time you do it.

The soaker and biga pre-doughs need to be made the night before. This allows for better digestion of the grains and also a softer taste. You can really taste the difference, too; yes, this bread is heavy, but it doesn't have a rough or chewy texture like many whole grain breads do.

If you haven't already, you may want to read about why using freshly ground wheat is your best bet. I like to use organic hard white wheat.


Crusty Oat & Flax Bread

Here's what you do:

Soaker:
7 tbsp whole wheat flour (we use freshly ground hard organic white)
1 c rolled oats
1/3 c flax seeds
1/2 tsp salt
3/4 c milk

Combine all and mix until hydrated.  It will look like a thick porridge. Cover loosely at leave out on the counter overnight.


Biga:
1 3/4 c whole wheat flour
1/4 tsp yeast
3/4 c room temperature water

Mix together. Using wet hands, knead dough in a bowl for two minutes. Dough should still feel tacky. Let dough rest for about five minutes, then knead again with wet hands for one minute.

Transfer to a clean bowl. cover, and refrigerate overnight.

In the morning, about two hours prior to mixing the final dough, set out the biga so that it can return to room temperature.


Final Dough:
All of soaker
All of biga
Approx 7 tbsp whole wheat flour
5/8 tsp salt
2 1/4 tsp yeast
3 tbsp sugar
1 tbsp oil

Chop or tear the soaker and biga into 12 smaller pieces, and dust with flour so that they don't stick back to each other.

Combine soaker and biga pieces in a bowl with the reamining ingredients. Knead with wet hands for about two minutes. The dough should be slightly tacky but not sticky; use more flour or water for adjustments if necessary.  Different flours absorb different amounts of moisture. 

Knead for 3 more minutes. Form dough into a ball and let it rest for five minutes while you prepare a lightly oiled bowl.  Here's what my dough looks like at this point:
 

Resume kneading the dough for one minute. Form the dough into a ball and place it into the prepared bowl. Cover loosely and let rise at room temperature for 60 minutes.

When the dough is ready, sprinkle a work area with flour and gently form it into a loaf (you can also place it into a standard bread pan if you prefer).   Place it onto a baking sheet dusted with flour.

Cover loosely, and let rise for 45-60 minutes.

Preheat the oven to 425. Place the bread pan on a middle shelf, and lower the temperature to 350. Bake for 20 minutes, then rotate the pan 180 degrees and bake another 20-30 minutes, until bread is a rich brown color.

Place bread onto a cooling rack and let cool for an hour before serving.

We use the bread (sliced horizontally) for sandwiches... isn't it pretty?


           Warmly,
post signature
{you can find more of my healthy, but yummy, recipes and read about our general food philosophy here}

{linked up with Real Food Wednesday and Nourishing Gourmet}


~~~~~~~~~~~~~~~
Thanks for taking the time to visit Like a Bubbling Brook.  If you're new here, you may want to subscribe to receive free updates via email so you don't miss a post.
 
Search & Win


8.28.2010

Free CD: Using Freshly Ground Flour in Bread Baking


If you enjoyed my post earlier this year about Why Grind Your Own Grain, then you may also be interested in this free CD about using freshly ground flour being offered by Bread Beckers, Inc right now.  Sue Becker presents Biblical and nutritional reasons why it is important to use freshly ground flour for baking bread.

           Warmly,
post signature

{Special thanks to my sister and also to Money Saving Mom for alerting me to this offer}
~~~~~~~~~~~~~~~
Thanks for taking the time to visit Like a Bubbling Brook. As another busy mama, I understand that your very few spare minutes are precious. If you're new here, you may want to subscribe to receive free updates via email. Thanks for visiting!
 
Search & Win


8.22.2010

Meal Plan Ideas (& This Week's Canning)


Last week I did quite a bit of canning; it began with peaches and ended with tomato sauce.  Since we use tomato sauce frequently, I made two kinds of sauce.

First, I made a batch of Tomato Basil Sauce from a recipe I found in Ashley English's book Canning & Preserving.  The sauce tastes wonderful (yes, I used one can already.... I was desperate to try it!), and I highly recommend this book if you are new to canning.  It was one of the best, most detailed books on canning that I have come across.

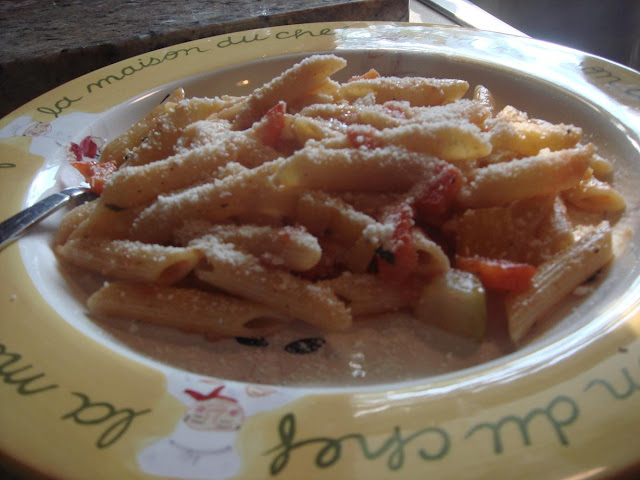
The Tomato Basil Sauce was a bit light, with more of a crushed tomato base.  The next time I use that recipe I will let it simmer a bit longer so it thickens a tad more.  It had a wonderful flavor, though, and was seasoned with onions, basil, and garlic.  When I used the one jar for dinner, I first gently sauteed some onion, red and yellow bell peppers, and zucchini, then I added in the sauce.  I served it over pasta, with some parmesan sprinkled on top:


Then, I made a batch of plain tomato sauce, based on the recipe at Heavenly Homemakers. I couldn't bear to leave the skins on (although Laura did) so I removed the skins first. I also added one tablespoon of lemon juice to each pint, just in case this batch of tomatoes didn't have enough acidity for the boiling water canning method (I'm trying to be ultra-careful about that!). Laura's idea for putting the quartered tomatoes into a blender made things progress more efficiently. I think I'll do that from now on :)


Finally, a sweet older woman from our church came over and helped me freeze corn on the cob this week.  We prepared and processed 60 ears of corn in a little over an hour.  It's amazing how quickly things get done when you have help!  As a thank you from us, she left our home with a box full of food: a dozen ears of corn, several large tomatoes, some cinnamon raisin walnut bread... :)


So, what's on my menu for this week?  As usual, our meals are healthy *and* frugal, usually costing us less than $5 total for dinner, sometimes less. We're trying to eat mostly from the pantry this week, with the exception of running to the store for some produce and milk.  I'm also trying not to pop open my freshly canned yummies yet, so here's what I came up with...

Breakfasts:
Horseradish eggs with dill
Maple pecan muffins
Cinnamon raisin walnut bread with homemade blueberry jam
Cereal and fresh fruit
"Salty" eggs

Lunches:
Tuna and cheddar on crusty whole wheat bread
Egg salad on authentic German pretzel bread
Caesar salad with chicken
Leftovers from the previous day

Dinners:
Chili pie, side salad, authentic German pretzel bread
Grilled chicken, grilled carrots, rice
Spaghetti with tomatoes, bacon, and onion, and crusty whole wheat bread
Chicken tacos with mexican rice
Beef (and kosher) hot dogs with corn on the cob

What are you serving for dinner this week? I'd love to know!

           Joyfully,
post signature

{Linked up with Meal Plan Monday}


~~~~~~~~~~~~~~~
Thanks for taking the time to visit Like a Bubbling Brook.  If you're new here, you may want to subscribe to receive free updates via email.
 
 Search & Win


Related Posts with Thumbnails